Technical Information & Support
Hints & Tips
Some ideas and suggestions based on the experiences of users of Syd and Jerry's Roaster
-
Be sure to clean your chaff collector screen regularly. In addition to brushing it off after each roast, it will need some further cleaning every 50 pounds of coffee or so. The screen will begin to plug up around the edge, which will be bad for the roast quality, as it changes the airflow and also prevents the temperature sensor from getting an accurate reading. We are now shipping roasters with a little wooden brush, shaped a little like a toothbrush, with brass bristles. If you got an early roaster and didn't get a free brush, it's worth going to the hardware store to pick one up. Use it to clean the screen, which you may even have to soak
overnight in Puro-Caf or some similar cleanser
once a week.
You may find that, despite your best efforts,
your screen is becoming clogged with carbon and
tarry build-up. This will have a definite effect
on the roasts. If things get to that
point, you can use "Easy-Off Heavy
Duty" (cold) oven cleaner. Spray it on the
screen, leave it over night, and scrub the
screen with a wire brush in the morning.
It will turn the aluminum ring around the screen
black, but the screen itself will come sparkling
clean. You can even use the cleaner on the
glass roasting chamber, but don't get overspray
on the wooden handle.
-
If you are having trouble with roasting decaf coffee, roaster users have come up with a couple of solutions to the problem - which is basically that decaf has no chaff, and thus allows a lot of airflow. One roaster user just adds about a half a cup of extra "green" decaf to the roast chamber at the start. Another method is to add a strip of ordinary metal window screen (about 3.5 inches by 18 inches) to the inside of the chaff collector, by rolling it up and letting unroll inside the slotted metal wall of the chaff collector base. It will keep beans from blowing into the chaff collector, and will help reduce the air flow as well. Be sure not to use plastic screen!
-
To get the best results in terms of roast repeatability, be sure to measure beans carefully, and use the same amount each time (one level can-full). Also, make sure that the top part of the roaster is always sitting down flat on top of the chaff collector screen. If there are big leaks of air in that area, it will change the temperature sensor's performance. Another important thing is to be sure that the machine is not subject to wind or strong drafts - as that will suck heat out of the area of the temperature sensor and produce odd results. The machine works best if it has vent pipe on it.
-
If you are getting variation in bean color within a single roast, be sure to check that the machine is level. If it is tipped significantly in any direction it interferes with the fluidization of the beans and can result in an uneven roast.
-
If you get to the point where you feel you need to clean the upper portion of the roaster, it is important that you do not disturb the temperature sensor, or significantly change its location. If absolutely necessary, you can take the whole upper portion all apart (the temperature sensor unplugs from the two wires that run down the left hand vertical rod). But be careful to note how it goes together, and do not try to clean the temperature sensor itself. If you mess up and break a wire or something, we'll sell you another sensor, but it won't be cheap... Also, avoid letting the wires that run inside the tube fall down in the tube. It would be a real headache.
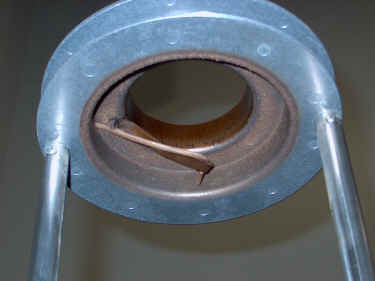
It is important that the temperature sensor not be moved from its intended position. It should be located as shown in the photo below, in which the front of the roaster is towards the camera. The tip of the temperature sensor should be about 1/4 inch from the cylindrical wall, and it should be parallel to the screen of the chaff collector (not touching the screen!) and about 1/4 inch from the screen.
-
We have noticed that in several installations the venting pipe is putting enough pressure on the upper portion of the roaster that it no longer sits flat on top of the chaff collector. If you don't have a reasonably good seal between the upper portion of the roaster and the chaff collector, you will get wildly unpredictable roasts, and maybe even a roaster fire. Check it out! It is very important that this problem, if you have it, is solved.
-
If you are getting bizarre readings from your circuit board, such as temperatures that don't make sense, you probably have a bad ground, or reversed polarity on your a.c. circuit. Polarity on an a.c. circuit? Yes, the big prong on an a.c. plug is supposed to be neutral, and the other prong "hot." If these are switched, or if you don't have a good ground, the circuit board's tiny brain can get confused.
-
"We have seen some cases of shipping damage to the roaster that are like that in the photo shown above. What happens is that when UPS throws the roaster out of a plane, it momentarily distorts the metal enough so that the rubber gaskets no longer seat properly. If the gasket is disturbed enough so that you can feel air leaking out of the front of the roaster, then the roaster will not function as well as it should. In any case, the disturbed gaskets are unsightly and should be fixed. If it is the upper gasket, it is simple to fix, by removing the six brass screws from the chrome plate (don't disturb the upper portion of the roaster where the temperature sensor sits), lifting the chrome plate, re-seating the gasket on the top of the red "U"-shaped housing, and screwing the chromed plate back down. If the lower seal has been disturbed, (as in the photo), the red "U"-shaped piece must be removed to re-seat the gasket. That is a little more involved, but still quite possible for the average level of mechanical inclination. Give us a call and we'll talk you through it.
-
We have seen some cases where roaster malfunctions have been provoked by an extremely dirty temperature sensor (see item 5 for a picture of the sensor). If enough grime accumulates on the ceramic body of the temperature sensor, it can effectively serve as an insulating blanket. If you are getting a lot of "E-2" and "E-4" error messages, but you know your gas supply is ok, then a dirty sensor is likely the culprit (or maybe a dirty chaff collector screen). You can take a pocket knife and gently scrape the body of the temperature sensor clean - supporting the sensor on the opposite side with your finger, as you go around it. Be careful not to bend the temperature sensor out of location, or to flex the wires clamped in the bracket any more than necessary. If you do break a wire the roaster will flash an "E-1" error code and refuse to operate until a new sensor is installed. A new sensor will cost $22.
We want to add to this section of the web page as we all acquire more experience with the roaster, so If you have any suggestions or questions that might be useful to other roaster users, please e-mail them to
syd@coffeekinetics.com.
Back
to Tech Info
|